Sunday, July 22, 2012

3 Ingredient Tzatziki


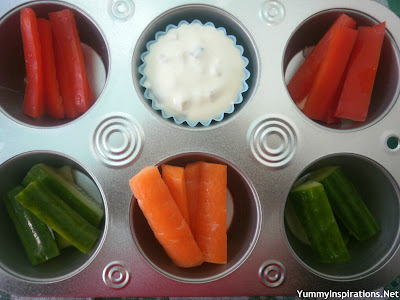
Recently I discovered that Mr 2 LOVES Tzatziki! We had some friends around and I put together a simple veggie platter, along with some (store bought) Tzatziki for dipping. Mr 2 proceeded to eat the majority of the Tzatziki by dipping vegetable after vegetable into the yummy dip. 

Inspired by his new-found Tzatziki love, I decided to make the yummy dip myself so I knew exactly what was going into it. My Tzatziki version is delicious and rich and contains just 3 ingredients - plain natural yoghurt, sour cream and cucumber - Mr 2's favorite vegetable.

Feel free to personalise the Tzatziki to your families taste by adapting the volumes to suit. You may prefer 50/50 yoghurt and sour cream, or even more sour cream than yoghurt for a richer treat. There's a whole cup of chopped cucumber in this recipe (please excuse my knife skills!) so you can enjoy a little bit of cucumber with every bite.

If you have leftover Tzatziki, try using it in place of mayonnaise in your favorite dishes. I've mixed some with Tuna and made a super creamy tuna mayo sandwich and have also mashed some Tzatziki into some hard boiled eggs for an even creamier version of my Egg & "Not" Mayo.

For a healthy kids snack, I surprised the boys with a Muffin Tin Meal one afternoon, complete with Tzatziki and veggie sticks for dipping. They loved it and of course Mr 2's favorite was dipping the cucumber sticks into his homemade, cucumber loaded Tzatziki!


3 Ingredient Tzatziki
3/4 Cup Plain Natural (or Greek) Yoghurt
1/2 Cup Sour Cream
1/2 Cucumber chopped, to make 1 Cup of Diced Cucumber

1. Combine together the yoghurt and sour cream until smooth and creamy.
2. Fold through the cucumber until well combined.
3. Serve as a dip for vegetables, or use in place of mayonnaise.

Makes 2 Cups of Tzatziki


More Yummy Dip/Spread Recipes:
Avocado & Spinach Sandwich Spread
Egg & "Not" Mayo
Roast Zucchini Sandwich Spread

Our family now firmly LOVES Tzatziki and I see myself making batch after batch of this yummy dip! What's your favorite dip for veggies?


Sharing at: Nifty Thrifty Sunday; Wellness Weekend; Sundae Scoop; Makin You Crave Monday; Mix It Up Monday; Monday Mania; Allergy Free Wednesday; Gluten Free Wednesdays; Slightly Indulgent Tuesdays; Healthy 2Day Wednesdays; Keep It Real Thursday;Pennywise Platter Thursday; Allergy Friendly Friday; Chef In Training; Muffin Tin Monday; What's for Lunch Wednesday; Melt in Your Mouth Monday; Motivate Me Monday; Mealtime Monday; My Meatless Mondays; Traditional Tuesdays

Monday, July 16, 2012

"Burger" French Toast


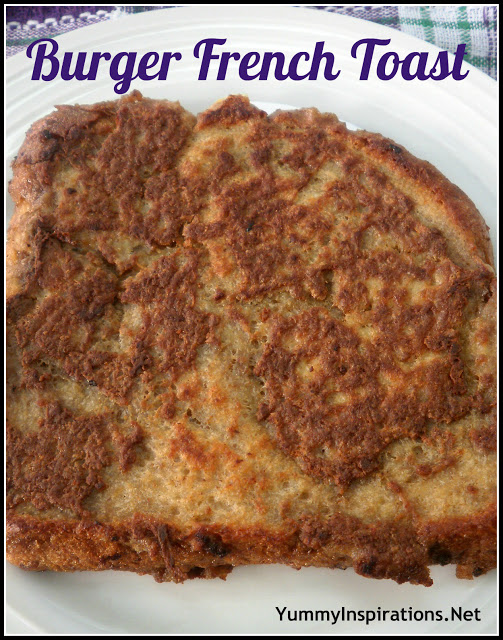
This Burger French Toast Recipe is the result of a complete accident. The eventful day occurred a couple of months ago. When making Bolognese, I like to take a handful of beef mince out and just fry them into little burgers for Mr 2. This way I know he is enjoying an adequate protein portion in his meal. I thought I'd add an egg to make the mince go a little further. On doing this I discovered that the "batter" was way too loose - 1 Egg plus a handful of beef = pancake batter consistency!

Thinking quickly, I then threw a few chunks of bread in to soak up some of the egg. I proceeded to fry the whole lot and it came out sort of like a cross between a burger and french toast. And so, Burger French Toast was born.

In the same meal I made plain french toast spread with avocado, for my fussy Mr 3. On presenting the meals to the boys, Mr 2 had meal envy and wanted his brother's Avocado French toast. Lucky for him, I was struggling to get Mr 3 to the table so Mr 2 ended up eating a couple of pieces of his brother's french toast.

It was at that moment that I wondered... What would happen if I spread a little avocado on this burger french toast and presented it to Mr 3 - my fussy eater who refuses to eat red meat in all it's forms. I buttered the burger french toast with avocado, and when Mr 3 eventually came to the table he ate the whole plate of it!! I was gobsmacked to say the least. This was the 1st time in my memory that he had willingly eaten red meat. I told him what was in it and he proclaimed it to be "delicious" and has eaten Burger French Toast at least once a week since then.

To make Burger French Toast, beat 1 egg and combine it with a quarter of a cup of beef mince until you have a mixture that resembles a french toast batter.

Then, dip your bread into your batter and coat both sides. You might find it easier to help the mince onto the bread by pushing it on with a fork. I used quite a thick piece of rye bread, if you have smaller slices of bread, then you may find that you have enough batter for two pieces of Burger French Toast.
Then it's a matter of frying your burger french toast in a little oil or butter, until browned and cooked through on both sides. Enjoy your Burger French Toast as is, or as Mr 3 likes it - spread with avocado.


I often serve him his Burger French Toast cut into little squares in a Muffin Tin Meal. Thankfully he loves this yummy dish, and it's such a relief for me to finally be feeding him some good quality red meat on a regular basis. (The bonus is that this meal takes mere minutes to prepare!)


Burger French Toast
1 Egg
1/4 Cup Beef Mince
1 Large or 2 Small Slices of Bread
Oil or butter, for frying

1. Beat the egg in a bowl and then add the Beef Mince. Mix until well combined and is the consistency of french toast batter.
2. Dip the bread into the batter to soak. You might find it easier to help the mince onto the bread by pushing it on with a fork.
3. Heat a little oil or butter in a frying pan and, when hot, brown the Burger French Toast on both sides until golden and the meat is cooked through.

Serve as is, or with your favorite burger toppings, such as tomato sauce, lettuce, onions, avocado etc.

Makes 1 Serve of Burger French Toast

Do you have any tricks to get your children to eat foods they aren't necessarily fond of?


Sharing at: Makin You Crave Monday; Mix it Up Monday; Monday Mania; Muffin Tin Monday; Talent Tuesday; Slightly Indulgent Tuesday; Allergy Free Wednesday; Healthy 2day Wednesdays;Tastetastic Thursday; Sweet Treats & Swanky Stuff; Keep It Real Thursdays; Strut Your Stuff Saturday; Wellness Weekend; Pennywise Platter Thursday;

Wednesday, July 11, 2012

Gluten Free Macaroni Cheese


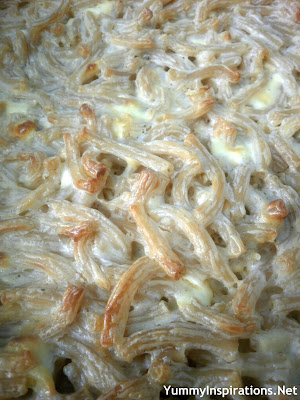
We love pasta in our house, and we love cheesy bake dishes even more. Unfortunately, lately we have found that Mr 2's eczema has worsened with the cold winter weather we are having. We have found though, that the less wheat/gluten he eats, the better his skin is. With that in mind, I've been trying to cook as many Gluten Free meals for him as possible and minimize his wheat/gluten intake. So, I thought a Gluten Free Macaroni Cheese would satisfy our pasta/cheese needs, while not disturbing Mr 2's skin too much.

I used a brown rice elbow pasta that I found at a local Japanese Supermarket. The boys eat the pasta by the bowlful so I thought I'd use it in a yummy Macaroni Cheese, a comforting dish to pick us up on a cold winters day.

To make the Gluten Free Macaroni Cheese, first, preheat the oven to 180°C/350°F and prepare the pasta according to the package directions. I used brown rice elbows, but you can use whatever gluten free pasta you have. If gluten isn't an issue, then use your favorite pasta instead. Once cooked, place the pasta into an ovenproof dish for your macaroni cheese.


To make the cheese sauce, you simply combine together the cream cheese, egg, milk and salt & pepper. I like to use my potato/vegetable masher to squish the block of cream cheese into a smooth  consistency of a creamy cheese sauce.

Then it's a matter of pouring the creamy cheese sauce over the prepared macaroni and stir to combine.
Bake for 25 to 30 minutes or until golden. A bowlful of this dish is so comforting you wouldn't want for anything else. I do, however, like to serve it was a salad or some vegetables on the side.


As this recipe was created with Mr 2 in mind, I kept the recipe relatively simple. He is a good eater, but prefers his ingredients separately on his plate.With that in mind, feel free to add all or any of the following optional extras:
  • A Cup of grated cheese for an extra cheesy topping.
  • Mix through a couple of teaspoons of your favorite mustard.
  • Vegetables - instead of serving vegetables on the side, you could cook some peas and corn into the macaroni.
  • Nutritional Yeast - I recently got myself a packet and am learning about this interesting ingredient. If you'd like to add some extra B Vitamins and cheesy flavor to your Macaroni Cheese, then sprinkle a couple of tablespoons into the cheese sauce.
I served the Gluten Free Macaroni Cheese to Mr 2 in a Bento meal, along with star shaped bananas, peas, corn and cranberries. He loved it! And most importantly - the meal didn't seem to irritate his skin.

Gluten Free Macaroni Cheese
250g (8.82 ounces) Gluten Free Macaroni (I used Brown Rice Elbows)
250g (8.82 ounces) Cream Cheese
1 Egg, beaten
1/2 Cup Milk (or use a Milk Substitute if you prefer)
Salt & Pepper to taste

1. Preheat oven to 180°C/350°F.
2. Cook macaroni according to package directions.
3. Drain and rinse cooked macaroni and place into an oven proof dish.
4. To make the cheese sauce, in a bowl, combine the cream cheese, egg, milk and salt and pepper. Mix together until well combined. I use a potato masher to make it easier to transform the thick cream cheese into a sauce consistency.
5. Pour the cheese sauce over the prepared macaroni in the dish and stir well to combine.
6. Place the macaroni cheese into the preheated oven and cook for 25 to 30 minutes or until browned.
7. Serve with vegetables or a side salad.

Serves 4 to 6

As I'm getting more into the gluten free way of cooking, I'd love to hear your gluten free tips and hints.

Sharing at: Slightly Indulgent Tuesday;Gluten Free Wednesdays; Lil' Luna; Allergy Free WednesdayFresh Foods; Whole Foods Wednesday; Healthy 2day Wednesdays;What's for Lunch Wednesday; Keep It Real Thursday; Sweet Treats & Swanky Stuff; Tastetastic Thursday; Pennywise Platter Thursday; Pin It Thursday; Allergy Friendly Friday; Makin You Crave Monday; Mix it Up Monday; Monday Mania;

More Yummy Cheesy Bakes:

Cheesy Cauliflower & Broccoli Bake
Macaroni and Cheese with Cauliflower & Coconut 
Potato, Tuna & Mushroom Gratin


Monday, July 9, 2012

Tropical Smoothie


I'd say I make smoothies for the boys at least every other day. My freezer is always stocked with a yummy array of frozen berries and fruit, ready to be turned into a smoothie treat at any given moment.

Most often I make a Berry Smoothie of some description. The other day I happened to have half a Pineapple, and a few other tropical ingredients on hand. So, I put them all together to create a Tropical Smoothie. The boys loved it and it disappeared in mere minutes. 

When I find my banana's going too ripe all at one, I chop a few up and place them in the freezer. Once frozen, the bananas bring a creamy smoothness to any smoothie, along with the added benefit of cooling a smoothie to an icy temperature instead of using ice cubes.

Tropical Smoothie
1/2 a Small Pineapple, chopped
1 Small Orange, peeled and chopped
1/2 Cup Coconut Milk
1/2 Cup Milk (use nut/goat milk if you prefer, or even all coconut milk)
1 Tablespoon Flax Seeds (Linseeds)
1 Frozen Banana, Chopped
Drizzle of honey or your favored sweetener (optional)

1. Place all the ingredients in a blender and blend until smooth. I usually blend and then taste a little with a teaspoon to judge for sweetness. Add sweetener to taste.
Makes Approximately 4 Cups (depending on the size of your fruit)

The inclusion of coconut milk in this smoothie made a sweet and delicious change from using "plain" milk. Do you have any yummy/unusual ingredients you like to include in your smoothies?

Sharing at: Mix It Up Monday; Monday Mania, Melt in Your Mouth Monday; Slightly Indulgent Tuesday;Talent Tuesday; Tuesday Talent Show; Gluten Free Wednesdays; Lil' Luna; Allergy Free WednesdayFresh Foods; Whole Foods Wednesday; Healthy 2day Wednesdays; Keep It Real Thursday; Sweet Treats & Swanky Stuff; Tastetastic Thursday; Pennywise Platter Thursday; Pin It Thursday; Allergy Friendly Friday;


More Yummy Smoothies:
Berry Banana Smoothie
Watermelon and Blueberry Smoothie

Tuesday, July 3, 2012

Raw Citrus Brownies


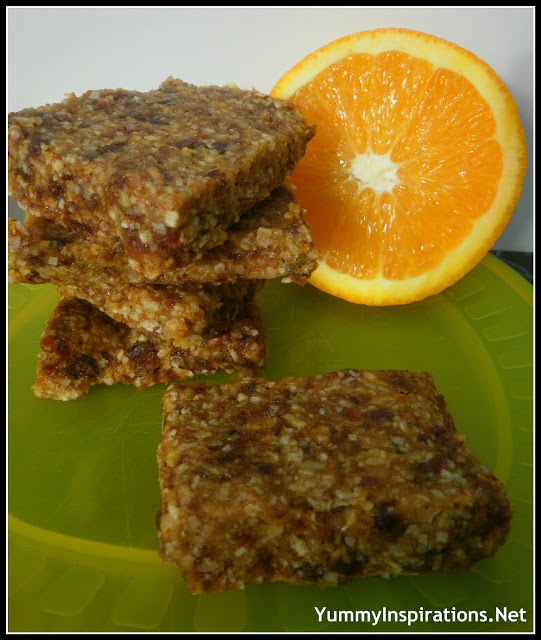
I revealed a few days ago that my family have cut out refined white sugar and highly processed ingredients. So, I have been on the hunt for sweet treats with no sugar and processed ingredients.

I came across these Raw Lemon Bars from The Rawtarian. I was instantly in love with them and made them that very day. I then tweaked the recipe a little to include the goodness of both oranges and lemons, changed the nuts from the suggested almonds to walnuts and we have Raw Citrus Brownies - decadently rich yet oh so good for you.

I like to chop my dates and walnuts to make it easier on my food processor. You could just throw them in whole, just be prepared for a bumpy ride while the processor works through it all. Feel free to substitute your favorite nuts. I love cooking with Walnuts because of their high levels of Vitamin E, which is great for your skin
Essentially, they comprise of Raw Walnuts and Dates, with some delicious and nutritious sweetness and flavor thrown in from orange, lemon and coconut. They truly are luscious, just look at the raw ingredients in all their glory, before they met their fate in the food processor.
 I love how the walnut in the middle looks a little like a butterfly!

This is the gorgeous mound of grated lemon and orange zest. I used a fine grater but you can use a zester if you have one. Just make sure you get only the orange/lemon rind and as little of the bitter white pith as possible.

Along with cutting the brownies into bars, I used a little bear cookie cutter and cut some into little bear treats for the kids. I served a brownie bear as a treat for Mr 2, along with some brown rice macaroni and chicken pieces leftover from making chicken stock. He also ate his way through half a raw red pepper while at the table! 

In the past week I've made the Raw Citrus Brownies twice and the family ADORE them. I gave a few to my Husband to take to work and he generously shared them with a couple of colleagues, who all asked for the recipe. So - I told him I'd just post the recipe on my blog and he could send them the link! (Hi to Hubby's Work Buddy's!! *waves*) Yes, I'm a little lazy, but I felt then I'd get to share the recipe with them and you at the same time - win-win!

Raw Citrus Brownies (Gluten Free, Dairy Free, Sugar Free & Vegan)
Adapted from The Rawtarian
1 and 1/2 cups Pitted Dates, chopped
1 Cup Walnuts, chopped
1 teaspoon Vanilla Extract
Zest from 1 Lemon
Juice from 1/2 a Lemon
Zest from 1 Orange
Juice from 1/2 an Orange
1 Cup Shredded Coconut
1 teaspoon Sea Salt

1. Place all the ingredients in a food processor fitted with an "S" Shaped blade.
2. Blend until well combined. You may need to switch the machine off and scrape down the sides with a spatula a few times until the mixture forms a sticky "dough".
3. Place the Raw Citrus Brownie dough into a dish, I used a rectangular pyrex dish.
4. Refrigerate for at least an hour to fully set and cut into bars.

These Raw Citrus Brownies are sweetened from natural sweetness of the dates and fruit. I'm getting more and more into sweetening treats with sugar alternatives and I'd love to hear from you about any unusual ingredients you use to sweeten your treats.

To recreate the bento meal, you'll need:


You'll also love:
Walnut and Cranberry Cookies

Sharing at: Monday Mania; Mix it up Monday; Talent Tuesday; Slightly Indulgent Tuesday; Tuesday Talent Show; Tasty Tuesday; Gluten Free Wednesday; Lil Luna; Allergy Free Wednesday;Whole Food Wednesday; What's for Lunch Wednesday; Fresh Foods Wednesday; Whole Foods Wednesday; Tastetastic Thursday; Sweet Treats; Pennywise Platter Thursday; Wellness Weekend; For the Kids Friday; Sundae Scoop; Melt in Your Mouth Monday;

Disclosure - this post contains affiliate links


Monday, July 2, 2012

Farewell to Breakfast Ideas Mondays


Today is Monday and usually I'd host a Breakfast Ideas Monday Link Party. I have made the decision that last week's party was the final Breakfast Ideas Monday.

Firstly - thank you so much to those of you who took part the full 10 weeks of the event, you inspired me to "think outside of the cereal box" and have had loads of fun and enjoyed countless new breakfasts.

The decision to stop running the party has not been an easy one and I finally decided to call it a day because I want to focus more on sharing a wider variety of topics with you. Also, I found myself scrambling to get the Breakfast Ideas post together and well written in time for Monday morning.

With my 2 young kids and an ever increasing workload in my Nutritional Medicine course, my time has become stretched incredibly thin. I want my blog to be a source of inspirational content and so would like to have a bit more time to focus on creating wonderfully inspiring posts to share with you.

I wanted to celebrate all the wonderful Breakfast Ideas shared in the past 10 weeks and finish with the features from last week's party.


Skinny Vanilla Mocha Frappe - Peanut Butter and Peppers

Please feel free to leave a link or two in the comments section if you had a post lined up to share with us this week - I'd still love to see what you were going to share. Also - in future if you prepare a Breakfast which you'd love to share, just leave the link in the comments below. I'll leave the Breakfast Ideas Mondays tab above so readers will still be able to enjoy the fun from past parties.

Once again - a HUGE thank you for sharing in the fun that has been Breakfast Ideas Mondays.